Greetings all,
With all of the hub bub with Death from the Skies, the Space Wolves essentially being given the big finger from GW proper as far as flyers went, ect, I decided to take some action. As you may or may not know, there is a FW flyer called the Storm Eagle which is available for use by the Space Wolves. Since I'm not a tournament player to begin with, an am pretty much of the camp that "FW models are just more expensive GW models", I started looking at getting a Storm Eagle. However, when I did my full pricing, it came up to $215 once shipping and customs was added. My days of paying $200 for a toy airplane that doesn't actually fly are way behind me. However, I've been thinking about it for a while and figured out the perfect way to convert the Storm Raven into a Storm Eagle. Now the method I'm going to show did run me about $115 of material, but it could be done for cheaper provided you don't buy the Resin Parts I did. To build a Storm Eagle you will need the following:
1 - Storm Raven Kit
2 - Foam Core/Plastic Card - Your choice based upon your skill, I used foam core.
3 - Hot Glue
4 - Super Glue
5 - Hobby Knife
Optionally you could also use (which is what I did)
Chapter House Studios TRU SCALE - Storm Raven add on parts.
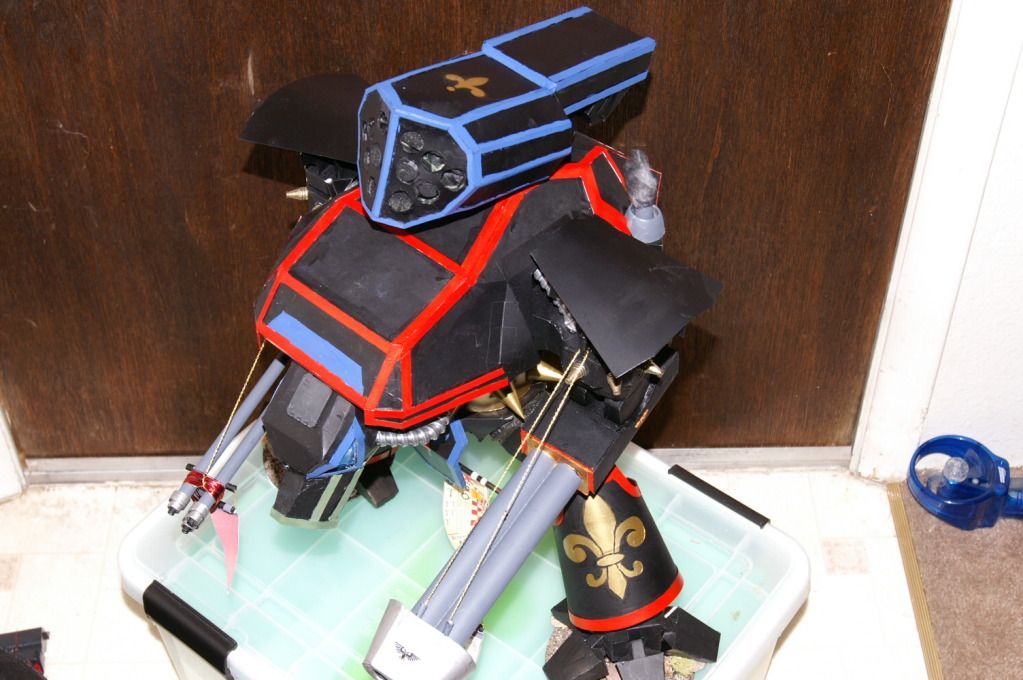
Step one is to build the Storm Raven Hull just like it shows in the instructions, but leave the back end off. If you buy the Chapter House kit, you add in those parts at this point, or build your own "extenstions" to the hull out of foamcore/plasticard. Your goal is to lengthen the hull of the vehicle an additional 2 3/4", remember there is an angle at the back. What you will have at that point is a body that looks like this.

Now, what you do next is partially up to you. Theoretically, you could just follow the Storm Raven assembly, minus the turret and the tail, add some missiles to the top and you would have essentially a Storm Eagle, but I decided I wanted to go as close as I could get to the FW model. So, that meant cutting on the wings and the engines, removing the cross members

and trimming down the engine cowling, to where it only goes half way over the engine itself. When I did mine, I messed up and cut too much off, and had to go back and make a filler part with foam core. However this is what you should be going for, with the correction I stated above.

Your cowling needs to come down to that halfway "ridge" you can see on the engine.
Now, we are also going to cut the wings a bit. Cut off the little tab on the wings and save it, because your going to use it and the part you just cut off the cowling for the engine to make the stabilizers later on.

Now comes the crafting part. We need to build a couple of things, namely the rest of the engine cowling, or at least enough to hold the wings where they need to be, and the spacers because the Storm Eagle's engines are out further from the body than they are on the Storm Raven. This space should be about 1/4" and go to the end of the engine cylinder before the taper for the Nozzle. If you don't get it just right, don't worry about it too much.

Next you are going to add some more foam core, namely the top "plate" and the stabilizer wings. The top plate spreads like a cobra hood from the body just forward of the intakes on the engine and then runs back. I also added the vertical Stabilizers and the missile pods I had left over from my Storm Talon at this point.

You will also need to add the canard winglets as well.

You can also see I went with the Twin Linked Lascannons, which I had from additional bits. The Storm Eagle has the option to field 4 Hellstrike Missiles, meaning you can just use the missiles the came with the Storm Raven instead if you so choose.
Once that was done, I added some more gribblies just to help "hide" the foam core a bit, and the result was this.


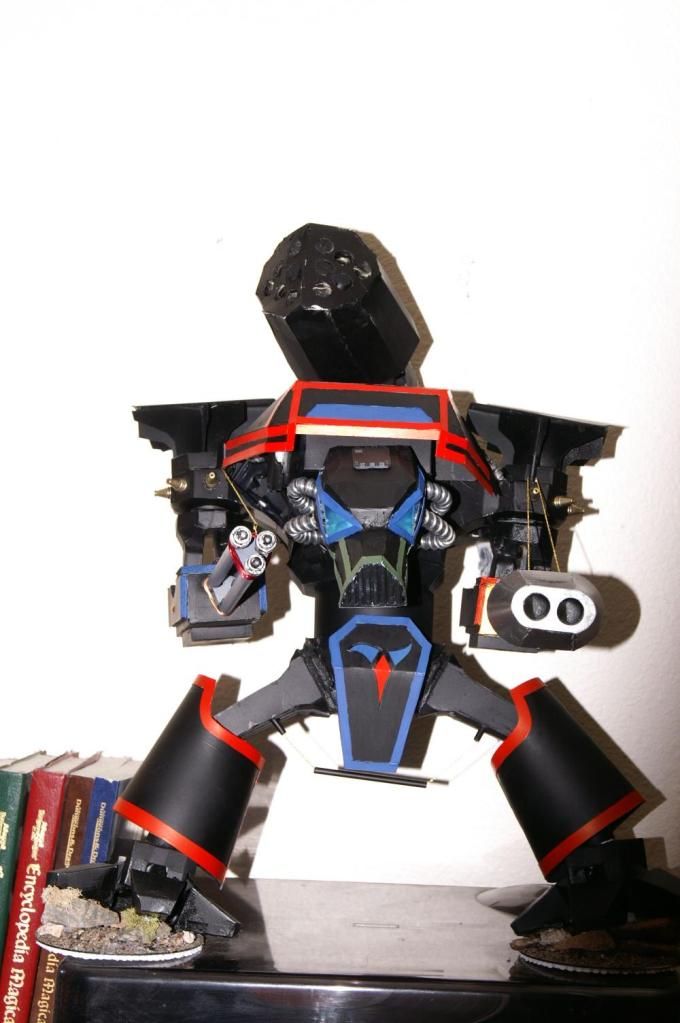
It's not a perfect recreation of the FW Storm Eagle, but I feel it is easily seen to be a Storm Eagle, it is the appropriate size (checked against measurements given, on length, width, and height, the difference is within 1/8"). The Chapter House Parts ran me $31.00 with shipping, but I feel they made the project a heck of a lot easier, and I can't recommend them enough, that being side, I made sure to trace the vital parts incase I needed to make a foam core body for a future build.